
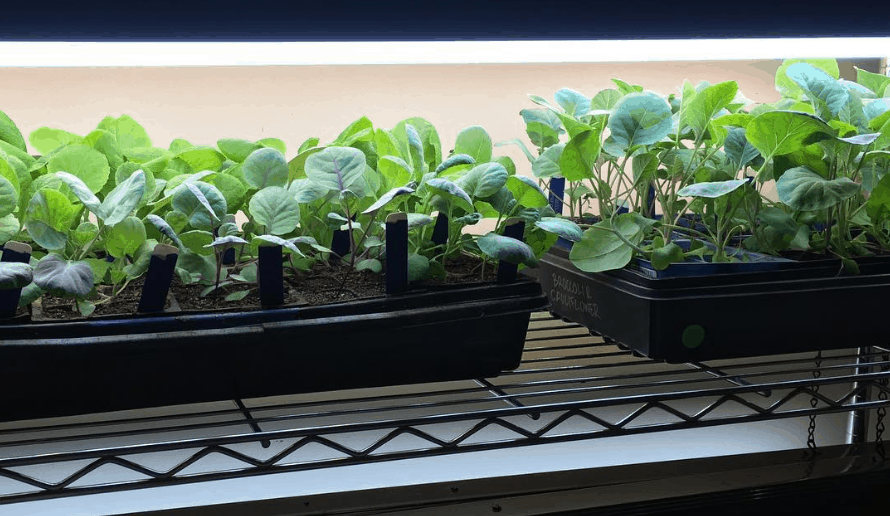
Want to garden like a pro? Here’s a simple and affordable indoor grow light setup
As an Amazon Associate, GrowJourney earns from qualifying purchases. Read more: terms of service.
Get a jumpstart on the warm and cool weather growing seasons AND grow food indoors year round with this DIY grow light setup.
*Note: We’ve recently updated this article to include the latest LED grow light technology in addition to common fluorescent shop lights which can also be used as grow lights. Since the original publication date of this article, the price of LED grow lights has decreased significantly, making them competitive with or in some cases even less expensive than fluorescent lighting. As a result, fluorescent shop lights can be increasingly difficult to find, making LEDs a better alternative.
Video: DIY fluorescent grow light setup and tips
*Note: Video may not display if you run ad blocking software. Advertisers help us make our content free to the public. If you’re unable to see the video, please temporarily disable your ad blocker – thank you!
Gardening: An investment worth making
Our family grows a lot of organic food in our yard. By virtue of the fact that we live in Agricultural Zone 7b in Greenville, SC, we get to enjoy relatively warm/moderate temperatures throughout the year, although our winters can get quite cold (nighttime low temps can go into the single digits).
Nevertheless, we’re able to grow food indoors AND in our yard 365 days per year. One winter afternoon after it hit 5°F, we uncovered our low tunnel beds and harvested spinach, kale, miner’s lettuce, chickweed, and cilantro for a salad.
Yes, gardening does take time and money. But is it worth it? Yes!
For instance, The National Gardening Association estimates that for every $1 you invest into your garden, you get $8 back.
Grow lights: a great return on investment for gardeners
We love helping people learn how to maximize their Return On Investment (ROI) in their garden, get huge yields, and do it all using organic/permaculture growing methods. Of course, organic gardening has a range of benefits that extend far beyond money, as we’ve discussed elsewhere. (See: The surprising benefits of gardening you may not know about...)
The highest ROI comes from the stuff you can get or use for free. For instance, most people bag and throw out their fall leaves. However, leaves are an incredible source of free nutrition that you can use to feed your beneficial soil microbes, which ultimately helps you produce more delicious organic food. With a couple hours of work, you can get hundreds or even thousands of dollars in return if you use fallen leaves to build soil in your garden.
Some of the other high-ROI things you can do in your garden do require an initial upfront investment of cash. For us, one of the things that has made the biggest difference—and created the highest ROI—is making our own indoor DIY grow light system.

Since we garden year around and have a large garden, we’re able to produce thousands of dollars worth of seedlings for our large garden which then grow to become thousands of dollars worth of food we eat. That’s a pretty good investment on a few hundred dollar investment made many years ago. If only stocks performed so well!
Top three reasons to make your own DIY grow light system
You don’t HAVE to have a grow light system in order to have great gardening success, but it certainly helps. Here are three reasons we recommend serious/more advanced home gardeners make a DIY grow light system:
1. Get a jumpstart on each growing season
In our Ag Zone, we start our spring and summer seeds indoors in late January through February, then transplant them outdoors after the last frost date.
This gives us a 2-3 month head start on the warm weather growing season. Translation: we get to start harvesting much earlier and for much longer than if we were to direct sow our seeds outdoors once the weather warms up.
The same thing is true when we start our fall/winter seeds indoors in July-August, then transplant the seedlings outdoors in September-October. Also, if you’ve ever started seeds indoors without grow lights, you might also realize how hard it is to get enough sunlight through your windows (even south-facing windows) to keep your plants from getting weak and leggy.

2. Grow food indoors
There are indoor grow light systems you can use to grow large plants like tomatoes, but that’s not what we’re discussing here. The grow light system we use and recommend is designed for starting seeds for transplanting OR growing smaller plants like lettuces and other greens for indoor harvests.
Also, using the grow light system in this article, you can easily grow enough greens and/or microgreens to get a nice daily harvest. If you live in a particularly cold climate, this benefit might be especially attractive since it’s more difficult for you to grow outdoors during the winter.

3. Improve seed germination rates
We start a lot of seeds indoors and outdoors. No matter where you live, an outdoor growing environment is always going to be a little less “stable” than an indoor growing environment— varying temperatures, soil moisture fluctuations, etc.
You’ll use less seeds and have a higher germination rate by starting your seeds indoors under grow lights. Not to mention, there might be hungry insects or other pests that are more than happy to chew down an emergent seedling soon after it punches through the soil surface in your garden—not so when you start your seeds indoors.

You can improve your seed germination rates and plant survival rates by starting your main seedlings indoors, then transplanting them outdoors once they’re 6-9 weeks old. Plus, if you have an edible landscape, more mature plants are more immediately attractive.
How to make your own grow light system
Both grow light systems we use (fluorescent and LED) have the following benefits/features:
- Relatively inexpensive and can easily pay for itself in a single growing season.
- Easy to break down and set up.
- Made with parts that can be ordered from Amazon or found at large home improvement stores like Lowes or Home Depot.
- Made with parts you never have to replace (except for the lightbulbs which need to be replaced every 10,000-50,000 light hours depending on manufacturer’s recommendations or visual signs that your plants are getting inadequate levels of light).
- Made with adjustable parts so you can raise or lower each row or each light, AND remove or add shelves as needed.
*Fluorescent bulbs produce 3x more light than incandescents, are energy efficient and non-heating. e.g. they’ll grow your plants with minimal impact on your energy bills. LED bulbs are even more energy-efficient than fluorescent bulbs. Since this article was first written, the price of LED grow lights has come WAY down, so we also have LED grow light options listed below.

1. The parts/materials for your indoor DIY grow light system:
Below are the parts you’ll need to build your own indoor grow light system. Note: We’re providing info for two different sized grow light setups using the same basic materials, PLUS two different types of lighting systems, fluorescent or LED.
We make notes where applicable if a product is not needed for an LED system. Our recommendation: choose an LED system instead of fluorescent lights! LEDs may be a touch more expensive upfront, but they’re easier to find, costs are quickly coming down on them, and they use less energy.
Option 1: LARGE grow light system
The large DIY grow light system (parts listed below) has 6 shelves, but you can’t hang lights above the top shelf, so there are only 5 shelves to put seed flats or plants on. It can easily accommodate 10 standard seed flats at once.
This system is ideal if you’re growing plants for a large garden/edible landscape or if you plan to start hundreds of plants indoors at the same time like we do.
- Total cost: About $300-400 depending on the products you choose.
Option 2: SMALL grow light system
The small DIY grow light system (parts listed below) has 3 shelves, but you can’t hang lights above the top shelf, so there are only 2 shelves to put seed flats or plants on. The shelves are also smaller than the larger system, so you can only accommodate 2 standard seed flats at once.
This system is ideal if you’re growing in a smaller garden/edible landscape or if you only plan to start/grow less than a hundred plants indoors at the same time.
- Total cost: About $200 depending on the products you choose.
Materials list for LARGE shelf grow light system:
- 48″ Multi-Tier Steel Shelving Unit (48″L x 18″W x 82″H) | there are a few product options here:
- A tall 82″ chrome-colored unit with 6 adjustable tiers and wheels – product link
- Same tall 82″ unit as above (82″), but black-colored – product link
- A shorter 72″ high steel unit with 6 adjustable tiers and wheels – product link
-
- 10-Outlet Power Strip – product link | quantity needed: 1 (it’s a 2-pack)
- Open Oval Chain (black finish) – product link | quantity needed: 1 ft strips x 20 total strips (whole roll, 50′) | Note: Depending on the shop lights you get, you may not need the chain since chains are sometimes included with the lights. Or if you get one of the recommended LED lights below, you won’t need chains at all.
- 20 S-hooks (can be easily adjusted with pliers) – product link | quantity needed: 20 for a 20-pack | Note: If you get LED lights, check to see what attachments come with them since you may not need separate S-hooks.

- Zip Ties – product link | quantity needed: we used 10-12 but they come in a bag of 30 (you can never have too many zip ties around!)
- LIGHTING: Choose either LED of fluorescent lights, but we recommend LEDs.
- Recommended LED light strips – We use Monios T5 light strips, hung two per shelf. These LED grow lights are thin and do NOT have a housing unit, which allows us to affix them right to the shelving unit while leaving plenty of space for the growing plants below. This means we can use all 5 available shelves. If you get hanging LED light systems with housing units, you’ll only have enough room to use 4 shelves. | product link | quantity needed: 2 (they come as a 6-pack, so you’ll get 12 strips if you purchase two products)

-
- Alternate LED light systems – In case our recommended LEDs are out of stock or you want something different, we’ve included a few other LED options below. Note that these options will likely require you to modify your shelving units to a 4-shelf setup.
- 48″ 64W full spectrum LED light strip – product link | quantity needed: 3
- 48″ 60W full spectrum LED light strip – product link | quantity needed: 3 marketplace=’US’ link_id=’dfb4f48e-f363-11e8-841e-3d02e29b0248′] per unit
- 4 pack – 48″ 60W full spectrum LED light strips – product link | quantity needed: 1
- Fluorescent lights
- 48″ Fluorescent Shop Light Housing – fluorescent housing units are no longer available on Amazon but may be available at your local hardware store or at retailers like Lowes and Home Depot | quantity needed: 10
- 48″ COOL light fluorescent bulbs – two options depending on pricing and what’s in stock:
- product link | quantity needed: we used 1 cool light bulb in each housing unit, or 10 total cool light bulbs
- product link | quantity needed: same as above
- 48″ WARM light fluorescent bulbs – product link | quantity: same as above
- Alternate LED light systems – In case our recommended LEDs are out of stock or you want something different, we’ve included a few other LED options below. Note that these options will likely require you to modify your shelving units to a 4-shelf setup.
Materials list for SMALL grow light system:
-
- 3-tier steel shelving unit (13″ L x 23″ W x 30″ H) – product link (*Note that the reason this unit is so much less expensive than a 5 or 6-tier shelf is that the width and depth are much smaller, so you won’t be able to put as many plant trays on it)
- 10-outlet power strip – product link | quantity needed: 1 (it’s a 2-pack)
- Zip ties – product link | quantity needed: we used 10-12 but they come in a bag of 30
- 24″ LED grow light unit – product link | quantity needed: 2 (it’s a 2-pack)
- Note: You may be able to find fluorescent shop light housing + 24″ warm and cool light fluorescent bulbs at you local Lowes or Home Depot, but those items seem to be very rare now. Plus, that setup will actually cost a lot more than the LED setup we recommend above.
- (optional but recommended) Shelf wheels | Note: these wheels allow you to easily move the entire grow light shelving system whenever, wherever you want – even when it’s full of seed trays. | product link (4-pack) | quantity: 1

2. Getting the proper fluorescent bulbs for grow lights
If you’re getting full spectrum LED grow lights, you can skip this section. If you’re using or planning to get fluorescent lights, you’ll want to carefully read this section…
As you probably know, light is essential for plant health/growth. Sunlight contains ROYGBIV, the full spectrum of colors of the rainbow that we all learned about in kindergarten.
The two most critically important light spectrums are RED and BLUE light.
- Red spectrum light stimulates growth and flowering, but too much red light leads to tall, weak plants.
- Blue spectrum light regulates the proper amount and distribution of plant growth, ensuring that all parts of the plant take on the proper size, shape and density.
The color of light created by each type of fluorescent bulb is determined by its interior phosphor coating. When using fluorescent bulbs, we recommend using a combination of these two types of fluorescent bulbs:
- “Cool white” fluorescent bulbs offer Y/G/B (yellow, green, blue) spectrum lights for your plants. Cool bulbs have a kelvin range between 5000 – 6000K.
- “Warm white” provides O/R (orange, red) spectrum light. Warm bulbs have a kelvin range between 2700 – 3500K.
So, install alternating cool and warm fluorescent bulbs into your light housing as indicated in the materials list above and shown in the image below. This way, you can mimic nearly the entire color spectrum of the sun, thus growing healthy seedlings and plants.

3. Other indoor grow light FAQs
Below are answers to the most frequently asked questions we get about our DIY indoor grow light setup:
1. Are LED grow lights better than fluorescent grow lights? Which should you get?
Short answer: yes, LED grow lights are better than fluorescent grow lights.
Longer answer: seedlings and more mature plants can grow well under either fluorescent or LED grow lights. If you already have a fluorescent grow light system like we do, there might not be any reason to replace it with an LED system, assuming the bulbs still work well and you have plenty of room to grow all the plants you want.
What are the benefits of LED grow lights relative to fluorescents?
- LED lights are far more energy efficient than fluorescents, delivering the same level of light to plants at about 50% of the energy output.
- There’s variability by brand and type, but you can expect to get about 50,000 hours of use out of LED grow lights before they need replacement, which is about 5x more than fluorescent grow lights.
- LED grow lights produce very little heat during operation whereas fluorescents will produce significantly more heat.
The price of LED grow lights continues to decrease each year. Since they can operate at lower energy costs and last longer, this means LEDs are almost certain to be a better financial investment over their lifetime relative to fluorescents, even if they’re presently slightly more expensive at purchase.
2. How many light hours do your indoor seedlings/plants need under grow lights?
Answer: Each type of plant is a little different, but generally speaking, your edible garden plants will do fine with 10-14 hours of indoor light per day. You can buy a timer if you want or just set an alert on your phone/calendar to remind you to turn the lights on in the morning and off at night.
Just like people, plants also need periods of darkness/sleep, so try not to forget to turn your lights off!

3. How close do you let your plants go to the fluorescent grow lights?
Answer: Keep your plants about 2-3″ from your fluorescent lights. If your plants start looking thin, leggy and weak, move the lights closer to the tops of your plants using your adjustable chains and S-hooks. If the leaves get scalded, move your lights higher (very unlikely to happen unless your plants are directly touching the bulb).

4. How often do I have to replace my fluorescent bulbs?
Answer: It depends on the bulbs you buy. Each manufacturer puts the estimated “lamp life” on the specs, which are often 20,000+ light hours. After a few years, if your bulbs are still working but your seedlings seem like they’re not growing as well, you may want to consider replacing them early.
5. How far do you keep seedlings under LED bulbs/lights?
Growing plants under LED bulbs is a little more complicated than under fluorescents:
- Sprouts & young seedlings – For sprouts and young seedlings, the general recommendation is to keep LED lights 24-28″ overhead. However, we’ve found our seedlings do fine even when they’re much closer than recommended, at least under our Monios T5 LEDs in the DIY grow light system we recommend in this article.
- Growth stage – After your seedlings are a few weeks old, you can lower the LED lights to 18-24″ over the top of your plants. (Or raise your seed trays up by putting objects under them.)
- Flowering/fruiting – If you’re growing plants all the way to production (ex. growing strawberries or tomatoes), you’ll want your LED lights to be about 12-18″ overhead during this stage of development.
6. What trays, cells, etc. should I get and what starting mix should I get/make?
Answer: Since we’ve had comments and emails from this article asking what seed starting trays, etc we use, we’ll quickly provide a bit of info here, then refer you to more detailed articles/videos we’ve created on that topic:
- Trays – Because we got tired of throwing away flimsy trays after one or two growing seasons, we now prefer these extra strength trays because they’re BPA-Free, SUPER durable, and also created by a local (to us) NC farmer who needed supplies that lasted longer than the current options: 5 pack & 10 pack
- Heat mat – Essential for getting good seed germination when starting tomatoes, peppers, and other summer nightshades indoors: 48″ x 20″ heat mat & thermostat to control temps
Want to learn more about seed starting? We have three free seed starting video classes (plus a free ebook) if you want to get the answers to all your seed starting questions. Plus, we also have a detailed guide showing you how to use Ladbrooke soil blockers.


Hello I’m new to gardening, and the hydroponic world. So I just purchased the Lyfreen Hydroponics Growing System Hydroponic Tower for Indoor. I feel like the height is not tall enough to grow much of anything. The grow height is 8 inches. Should I just return this and build my own. I paid $297. Ido not have a clue about the grow height.
Hi Pat! I just looked up the product specs on the grow light system you purchased because I was surprised that 8″ would be the provided grow height. Sure enough, it’s 8″. That’s not much height if you want to grow anything beyond microgreens, small seedlings, and a limited range of small-growing or immature plants. Ideally, we’d recommend a system that allows for adjustable light or shelf heights so you can raise or lower the lights over your plants as-needed depending on where they are in development. Whether or not you return your system and get a different one will depend on what you intend to grow. For instance, we start many of our summer plants indoors in the winter as early as February. By the time we start hardening them off outdoors in natural sunlight in preparation for transplanting, they can easily be 12″ tall. So a system with 8″ maximum height wouldn’t work in that context.
The reason we decided to come up with our own DIY indoor grow light system was both for affordability and so that we could have a system with maximum flexibility. We can grow everything from microgreens to 12″ tall head lettuce to seedlings. Hope this helps and best of luck!
This is my first time planting seeds indoors, and after reading this page I am now buying and using grow lights. I see that you recommend putting 2 light strips per self, using the LED single strips. What do you recommend if I opt to buy a dual growing strip? I would be placing my trays (which measure 10.5 inches wide) parallel under the lights. My question is would the plants receive adequate light if I used one dual growing strip, and is their any significant difference between using two single strips next to each other vs. one dual strip? Thanks!
Hi Laura! Sorry for my slow response. That’s a hard question to answer without knowing more about the grow light system you’re using (light output details, dimensions, spacing, etc). Worst case scenario is you trial your system this year/season using one dual LED strip and take careful note as to whether you’re seedlings start getting leggy or not. If not, you’re good to go. If they do start getting leggy, you’ll either need to move your seed trays closer to the light or get a second dual LED strip to provide adequate light. Regardless, good luck with your grow lights and garden!
I plan on purchasing the 6 tier grow light system using the LED lights and understand that I can only use three shelves and need only purchase 3 LED lights. However doesn’t this then mean I can only grow 3/5 of the plants that the fluorescent system allows?
Hi Karen, and apologies for just seeing your grow light question. Answer: yes, depending on the LEDs you use, you’ll probably only be able to do 3 shelves of plants. We’re going to try out some different LED setups to see if we can get a comparable amount of growing shelves to a fluorescent shop light setup, but that is currently one of the downsides of LEDs when it comes to seed starting with a smaller home setup.
thank you Aaron for getting back to me. please let me know how the different set ups go. i just ordered my grow light set up. i have another question. i purchased heat mats. Is it necessary to have thermometers for each mat?
It can’t hurt to use a thermostat with your heat mat, but you don’t have to (assuming you’re using quality heat mats like a VIVOSUN). We don’t use a thermostat. Another thing: a heat mat is great for getting optimal seed germination for your summer varieties, but you don’t have to keep it on for your seedlings.
Hi I have a greenhouse outside and want to boost the light in the fall and winter. My shelves are 24″ wide and 8′ long. Do you have recommendations for that?
Hi Lor! You may want to go ahead and get LED grow lights that match your budget and setup. For instance, something like this might work for you depending on the spacing between your shelves: https://amzn.to/3niAXKP. Best of luck!
Hello, the link to the fluorescent light housing is not valid. Do you have an alternative option? Thank you.
Hi Astor! Sorry for our delayed response. It’s becoming harder and harder to find fluorescent light housing since LEDs have come down in price so much and are more energy-efficient than fluorescents. You may want to go that route instead. Another option is to call your local Home Depot or Lowes to see if they happen to carry any. Best of luck!
Hello. The link to the 48″ florescent light housing does not work. Do you have another recommendation? Thank you!
The setup shown here is a good example for those who want to try indoor gardening. Thank you for sharing this idea.
Hello. Instead of using the cool & warm fluorescent lights, could you use fluorescent grow lights? (32w, T8 grow flourescent light bulbs, 7,000kelvins)
Hi Rhonda! If they’re manufactured specifically for use as grow lights (and seedlings), they should be fine. That’s a pretty high kelvin level. For reference, the cool white fluorescent bulbs we’ve used are 5,000 – 6,000K and our warm white 2,700-3,500K.
Hi Aaron,
I noticed that the first two links to your recommended four-foot LED lights go to pink/purple lights and the third link goes to warm white lights.
Is there really a difference in the effect this has on the plants? For aesthetics, I’d prefer the warm white lights over the purple ones (my rave days are long past) but my friends swear by their purple lights for seed starting.
Which kind do you use?
Thanks!
Hi Robin! Short answer: you’re fine to get either option (pink, purple, or white LEDs) for seed starting.
Longer answer: there are some differences between setups. Pink LEDs are a combination of white and red LEDs. Purple LEDs are a combination of blue + red LEDs. White LEDs are only white. The reason for these differences isn’t merely cosmetic. For instance, purple LEDs contain the red spectrum for maximum photosynthetic efficiency, but this can make plants grow too fast, which is why it’s balanced out with blue LEDs so plants stay healthy and more compact/robust.
From an energy efficiency standpoint, purple LEDs are the most efficient, but the difference in energy/money savings won’t be significant for a small home setup (more so if you have a giant greenhouse operation where minor differences become magnified with scale). Pink LEDs are the second most energy efficient setup, followed by white. “White” LEDs also vary by manufacturer and system: cool, warm, mint, etc. Again, for the sake of seed starting at home, the differences between the color of LEDs will be minimal, both on plant health and energy efficiency due to the quantity used and the fact that you’re typically only growing seedlings under lights for 6-8 weeks prior to transplanting.
So if cosmetics and not reliving your rave days is the most important factor to you, you can dance to whichever color floats your fancy. 😉
Thanks! We’ve followed this setup and are starting a course for patients at the in-patient hospital I work for.
When first starting seedlings and using the humidity dome… If some of the varieties come up, but others are lagging behind should I remove the tray from the heat mat and remove the humidity dome? I don’t want to kill off the seedlings that have come up, but at the same time I want the remaining seedlings that have not emerged to have the best chance of making it.
Hi Justin! Frankly, we’re not fans of humidity domes for two reasons:
1) They tend to make it too humid and not allow for adequate airflow. These conditions promote a fungal disease called “damping off” which infects the stems of the young seedlings, killing them and then spreading to other plants in the tray.
2) The domes make it hard to get the grow lights close enough to the seedlings to provide adequate light and they also filter some of the light out when moisture collects on the top surface of the dome.
Instead, we recommend going dome-free and just doing a good job of watering your pre-emergent or already emerged seedlings while providing them ample light and airflow. This approach only requires 1 or maximum 2 waterings per day depending on the stage of seedling development. Prior to germination or when the seedlings are young, one watering will suffice. Once the seedlings are fairly large and near transplanting stage (6-8 weeks old), 2+ daily waterings may be needed depending on the size of the seed cell and plant that’s growing.
To directly answer your question: if different plant species (example: peppers and tomatoes) or varieties of seedlings within the same plant species (example: different cultivars of tomatoes) don’t emerge at the same time, that’s perfectly normal. Days to germination varies by species and sometimes even a little bit by cultivar. Please let me know if this reply provides clarity for you and/or whether you have additional questions. Good luck!
Thank you. Very helpful!
Up to this point we have been removing the dome as soon as a little more than half of the tray has sprouted. Would leaving the emerged seedlings on the heat mat while the remaining seeds germinate and sprout be harmful to them?
Also, how close is too close as far as the LED lights go? Various sites state that there is no hard and fast rule regarding this – most are saying 12-20 inches (or follow the guidelines that came with whatever lights you purchased). I know that if they’re not close enough the plants will become leggy, but too close they may start to bleach or burn. Our current setup allows for 12 inches but not much more.
No, leaving the emerged seedlings on the heat mat while the remaining seeds germinate and sprout would not be harmful to them. Unfortunately, there isn’t a definitive answer on the LEDs because it depends on your specific equipment, but the 12-20 inch range is standard. It won’t take long (~2 days) for you to notice either extreme: leggy seedlings or sunburned seedlings.
Hi! Thanks for all of this info!
I have 24 inch LED lights and some of my seedlings are a little leggy so I put the light closer. Still some seedlings are leaning towards the light. Should I have two LED lights for each shelf? Trying to figure out if I need to buy more. The 24 inch LED lights you have the link for are what I have. The box said the lights can go between 8 inches and 18 inches, so I have them about 10 inches right now.
Any thoughts on this?
Hi Shaina! So sorry we missed your comment/question about your LEDs. If your seedlings are still leggy, you can either shift the lights over the seedlings each day at set times to a slightly different spot so as to be directly above the seedlings OR get additional lights. It’s hard to say for certain what’s happening without seeing a photo of your setup. Feel free to email a photo to me at aaron @ growjourney dot com (spelling out to protect from bots) if I can be of help.
Hi Aaron,
Quick question, as I am trying to set up an indoor grow area to start my seeds early. I was wanting to purchase LEDs for each row and then I read below that when using LEDs over newly germinated seedlings that they are to be hung around 2 ft above them? Is this correct? If so, does this shelving unit not work with LEDs since each shelf is most likely no more that 1.5” tall? Or, once germinated, is it possible to hang an LED simply at the top of the bottom of each shelf to give about a foot of distance between the light and the plants? Please let me know if this unit with the 5 shelves will work if I purchase 5 double LED lights for each shelf. Thanks!
Sorry when I used “, I meant ‘, meaning 2 or 1.5 feet not inches. Thanks!
Hi Maegan! Very sorry for the confusion on that and thanks for catching the mistake. Yes, LED lights are going to be hung ~ 24” above the plants/seedlings, thus you can’t set up all six shelves in the larger setup. You’d only use four shelves, three of which have plants on them. Therefore you only need 3 LED lights. We’ve edited that section of the article. Thanks!
Great guide! I’m planning to start with the smaller grow light setup. Thanks for sharing!
Hi, thanks for all your great info. I’d like to try making something like the large system but money being tight I’d like to keep costs down as much as possible. I was thinking I could use wood & hardware I already have to build the system directly on the wall. That way I’d only have to purchase chain, lights, and a timer. Do you forsee any problems with this method? Would my drywall be in danger from moisture? Another question I have is about sprouting the seeds without using multiple warming pads. Would it be possible to sprout more seeds at once in wet paper towels on 1 heat pad and then transfer the sprouted seeds to the starter mix? I’ve never successfully started seed indoors and I’m the scatter-and-cross-my-fingers type of gardener so any advice you can provide is very helpful!
Hi Allison! Answers to both your questions:
1) The devil’s in the details as far as whether you’d potentially cause water damage to your drywall. It really depends on how close your seed trays are going to be to the wall, and how careful you are when you water your plants. But, it shouldn’t be a problem so long as you’re careful. Frankly, the potential problem you’ll probably need to be more concerned with is the wood underneath your seed trays and the flooring underneath your seed starting station. You’ll inevitably have some water or soil spills, so ideally you can have your setup over tile or vinyl for easy cleanup.
2) Yes, you could easily start multiple seeds on a warm, damp paper towel, then transfer them into cells with seed starting mix once they germinate. Certain plant species really don’t like root disturbance (example: cucurbit family plants like squash and melons) so just be careful not to damage the delicate roots when you transplant them. When we’re starting a ton of heat-loving summer seeds, we often use small Ladbrooke soil blockers for the reasons you outlined, then pot them up to larger blocks 7-14 days after germination, but that’s probably not something you need to worry about given the extra cost and expertise involved: https://www.growjourney.com/use-ladbrooke-soil-blockers-seed-starting/. Something you may want to consider later down the road though. 🙂
Best of luck with your new DIY grow light setup!
Also if I may ask, do you have any reasoning for using both warm and cool spectrum bulbs for what would otherwise be vegetative stage grow projects (greens)? I thought cool spectrum is all this type needs. Thank you.
Our understanding is that plants in all stages of growth really benefit from a full light spectrum comparable to what they’d get outdoors via natural sunlight. Since it isn’t too hard to mix cool and warm spectrum fluorescent bulbs in this grow light setup, we figure it makes sense to go ahead and do so. You could probably get away with a more narrow spectrum bulb setup in a pinch.