

8 tips to avoid or fix compacted garden soil
As an Amazon Associate, GrowJourney earns from qualifying purchases. Read more: terms of service.
Are you trying to fix compacted soil in your garden or yard? Or do you want to avoid compacting the soil in the first place? Use the helpful tips in this article to find out how!
Helpful analogy: stone vs sponge
What happens when you pour water on to a solid surface like a stone countertop? What happens when you pour water over a sponge?
These two scenarios are very analogous to something you see every day but may not notice: soil compaction. Highly compact soil functions more like a stone countertop than a sponge: rain water pools on top and runs off, rather than penetrating and saturating. But that’s only one of many problems created by compacted soil…
What is soil compaction?
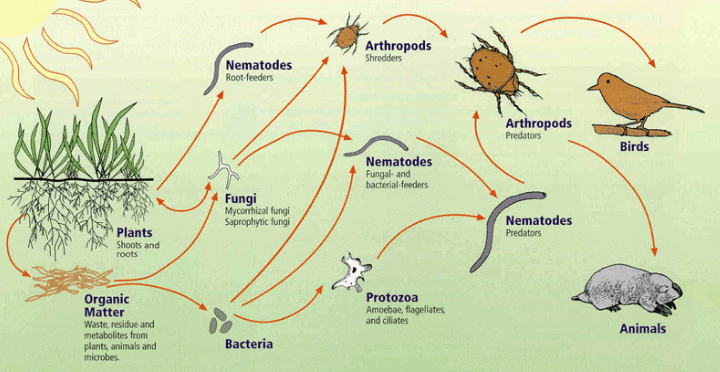
The simplest definition of soil compaction is the reduction of pore space in your soil. In nature, pore space is created and maintained by myriad soil organisms, from worms to fungi to bacteria.
What causes soil compaction?
On farms, soil compaction is caused by the combination of:
- repeated cycles of tillage which destroy the soil structure;
- heavy equipment and heavy machinery like tractors running over the soil surface (this is especially problematic with wet soil);
- the one-two punch of chemical fertilizers and pesticides.
In home food gardens, soil compaction is caused by:
- repeated tillage;
- walking repeatedly on the soil surface (similarly, on lawns, soil compaction is caused by high foot traffic, parked cars, and heavy lawn mowers);
- not adding microbe-rich soil amendments such as quality compost or worm castings;
- not protecting the soil surface with either mulches or living plants.
Also, certain types of soil are more prone to compaction. For instance, compacted soil is a more common problem here in Greenville, SC, than other areas of the country due to our heavy clay soil. People in the Midwest, which features rich prairie soils (silty clay loam), are less likely to experience hard-packed soil.
What problems are caused by compacted soil?
Soil that has been heavily compacted will not be able to:
- absorb or hold water, which then leads to increased irrigation needs and higher rates of soil erosion (thus, huge amounts of topsoil, fertilizer, and pesticides are washed off of farms and into local waterways);
- cycle nutrients or maintain fertility (which leads to higher fertilizer use);
- have good seed germination rates;
- provide sufficient oxygen to grow plants or allow plant roots to penetrate deep into the soil;
- have a flourishing soil food web or high microbiological activity necessary to feed and nurture plants.
Simply put, compacted soil is dead soil (or at least soil on life support) that is unable to grow healthy plants. The good news? You can take steps to both prevent or fix soil compaction.

5 Ways to Prevent Soil Compaction From Happening In Your Garden
Since the focus of this article and website is home food gardens, here are the best methods you can utilize to prevent soil compaction in your garden:
1. Don’t stand or walk in your garden beds.
We see many new gardeners and garden visitors breaking this rule, so it bears repeating: do NOT stand or walk in your garden beds where you intend to grow plants!
If you do this on a regular basis, you’ll compact the soil.
2. Install garden paths and/or stepping stones.
What do you do if you need to walk around in your garden or step into certain spots to harvest? Install walking paths or stepping stones.
Stepping stones do mildly compact the soil, but they work like snowshoes, distributing your weight over a broader surface area. If you’ve ever turned over a large stone in your garden, you’ll also notice that they provide great habitat for worms, beetles, and other organisms.
Stepping stones also provide a visual reminder to you and others that “this is where you should step.”
3. Make the width of your garden beds no wider than twice your arm length.
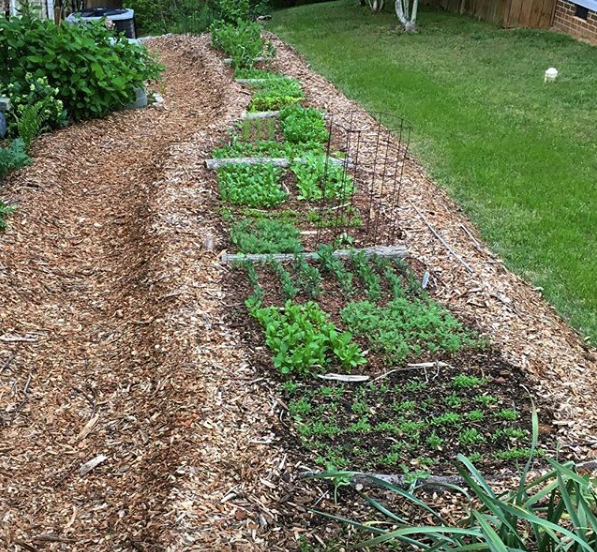
As a general rule, don’t make your beds wider than 4 feet if you have a walking path on either side of the bed. This allows you to easily reach the middle of the bed from either side without having to step into the bed.
If there’s only a walking path on one side of the bed, only make the bed the width of your arm.
4. Use raised beds or fencing if/when necessary.
If you have children, large pets, or a high-trafficked yard where you also want to garden, it probably makes sense to install either fencing or raised beds — or both.
Here’s a list of our top recommendations of quality raised garden beds you can quickly assemble that won’t cost you a fortune.
5. Feed your soil, don’t till it.
We haven’t tilled our soil in a decade, and we started with heavily compacted red clay in our garden. Despite conventional wisdom, tilling your soil is unnecessary and it’s actually quite harmful to the trillions of living organisms that make soil healthy.
Instead of tilling your soil, “feed it” by top-dressing the soil with:
- a few inches of compost, worm castings, and/or leaf mold during each season transition prior to sowing seeds or putting in new transplants; and
- mulches such as shredded leaves, wood chips, straw, etc.) placed on top of the compost layer.
Also, try to keep living plant roots in the ground at all times, if your climate permits. In the cold months, you might also consider the use of a cover crop like winter wheat, winter rye, and/or Austrian winter peas. These can be used as a mulch crop in early-late spring via a chop-and-drop method or by using a roller-crimper device (if you have a large vegetable garden).
These simple methods prevent soil compaction while allowing nature/biology to do the hard work for you.

Three Ways to Fix Compacted Soil in Your Garden
Are you trying to figure out how to fix the dense soil in your garden that’s already heavily compacted? The good news is you can regenerate healthy soil very quickly and with surprisingly little work.
We’ve read piles of research on this topic and put that knowledge to work on heavily compacted red clay soil in our own yard.

Here are three ways to fix heavily compacted soil in your yard/garden, depending on whether you want to take a slower, less work-intensive way or get your soil fixed now:
1. Slow way to fix compacted soil – about 1 year
Pile organic matter 12-18″ deep on your soil surface. Organic matter can be any of the following (or combinations of the following):
- wood chips
- chopped leaves and yard clippings
- straw or pine straw
Assuming you live in an environment that gets heavy rain several times per month, this organic matter will slowly decompose and come alive with worms and other soil organisms. After a *year or less, all of (or at least the vast majority of) the organic matter will have decomposed, becoming rich, garden-ready soil in the process.
*Keep in mind that:
- Lighter, less carbon-dense materials (ex: pine straw) will decompose faster and provide less final soil depth than heavier, carbon-dense materials like wood chips. 12″ of wood chips might result in 6″ of topsoil, whereas 12″ of straw might result in 1-2″ of topsoil.
- Organic materials will decompose faster in warmer, wetter environments than in cooler or dryer environments.
Once the organic matter you’ve placed on your compacted beds has been converted into soil, it’s time to put plants in the ground!
2. Medium length way to fix compacted soil – about 1 month
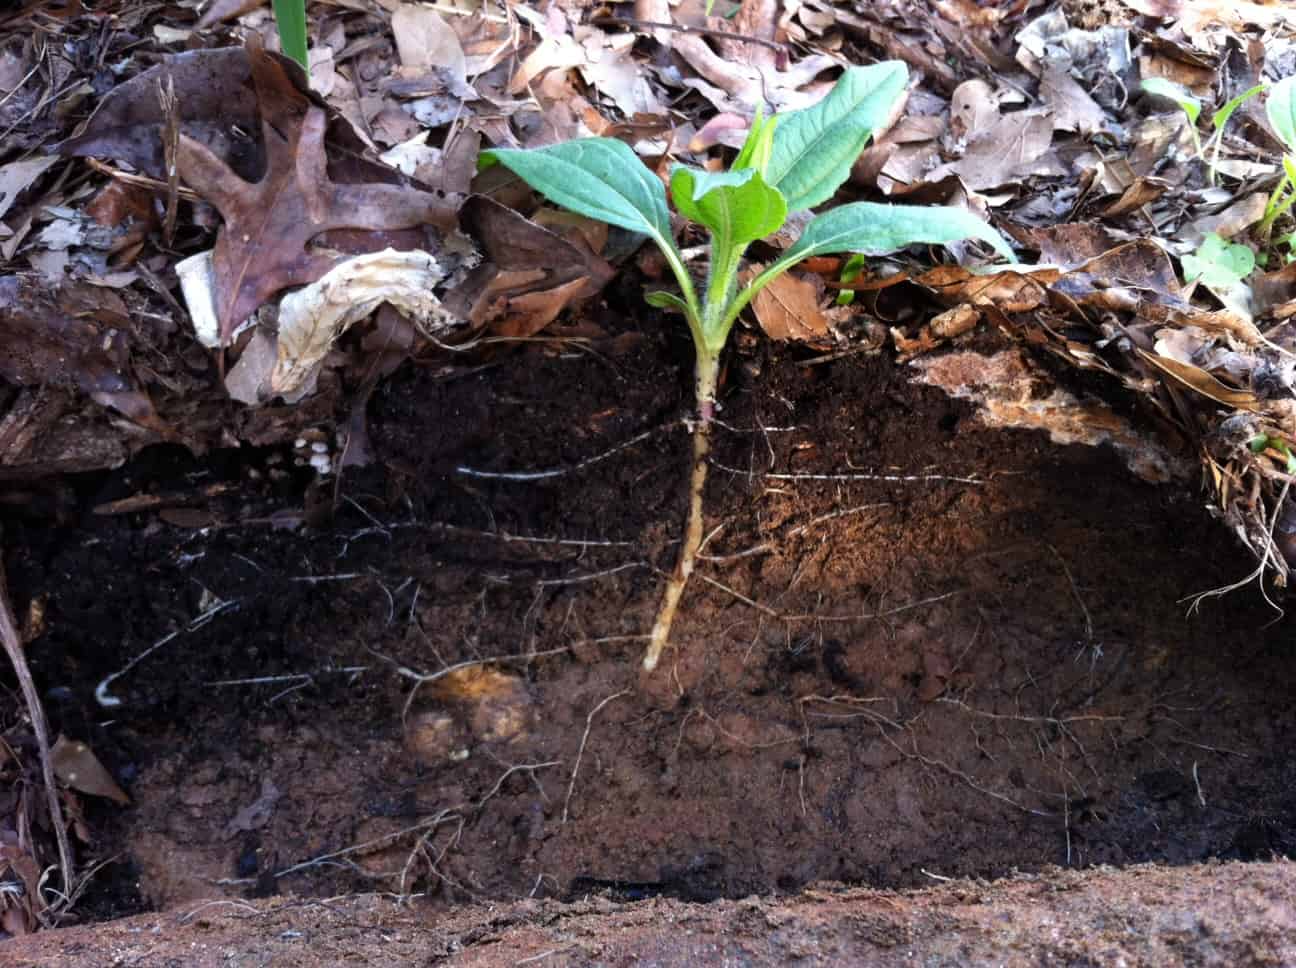
Macro and microorganisms in soil are what naturally build and maintain healthy, living soil. When soil is compacted, those organisms can’t penetrate, move around, or find plant roots to symbiotically interact with.
How can you quickly regenerate the health of previously compacted soil in your garden? First, till the surface or break it up with a shovel or broadfork. Next, spread 2-6″ of high quality worm castings or compost on the surface. Finally, cover the castings/compost with 3-6″ of mulch.
Make sure the area gets 1″ or more of water per week. Your beds will be ready to plant within a month. Just pull back the mulch by hand wherever you intend to sow seeds or put in transplants. Of course, continuing to add worm castings, compost, and mulch 1-2 times per year will continue to improve the health and depth of your living garden soil, so keep at it!
Just to be clear: mulch is the top layer! If you put carbon-rich mulch under your compost or worm castings, you’ll temporarily lock up bioavailable nitrogen until the mulch has been decomposed. However, top-dressing a bed with carbon-rich mulch will not result in nitrogen deficiency.
3. Fast way to fix compacted garden soil- 1 day
Do you have highly compacted soil but want to be able to “fix it” and put in seedlings or sow seeds the same day? If you’re more of a hare than a tortoise, no worries. You’re going to do pretty much the same thing as in #2, but with a few modifications.
First, till or break up the top of the compacted soil (using a tiller, shovel, or broadfork). Then add worm castings or compost, but apply them more deeply: 6″ thick or more.
Next, put in your seeds or seedling transplants. Now, instead of top-dressing the beds with 3-6″ of mulch, put down a thinner mulch layer about 1-2″ thick. A 1″ or thinner straw or pine straw mulch works great here if you’re direct sowing seeds since a light mulch layer won’t block out germinating seeds. If you want to use a heavier mulch like wood chips, taper them off wherever you’ve planted seeds so you don’t block the germinating seeds from reaching the surface.
The compost/worm castings will provide your new seedlings with the bioavailable nutrition they need while the microbes and plant roots start to bring life back into the previously compacted soil.
Regardless of which approach you take to prevent or fix compacted garden soil, the aim is to let natural processes do the bulk of the work for you, creating rich soil filled with healthy roots and beneficial soil organisms.
If you want to really geek out on understanding how soil works and how farmers are using similar methods to regenerate healthy soil on large acreage, we strongly encourage you to watch this presentation by one of our heroes, soil microbiologist Dr. Elaine Ingham.




Just a few years late, but hopefully I’ll get an answer! I just filled a raised bed with mushroom compost and top soil. The soil was delivered in a scoop, and I didn’t realize how compacted it was. I put my flower seeds down on the mixed soil/compost, but I did a ¼” layer of the top soil, and now it’s hard and the water barely drains. Is there any way to fix this?
Hi Brittany! Sorry for our slow response. To fix compacted soil in a RAISED garden bed, I’d recommend mixing in perlite at about a 1:4 ratio with your existing soil. While you’re amending, I’d also add in a good bit of quality compost or worm castings, whichever is easier for you to get your hands on. Then get plants growing in the soil asap. From there on, you shouldn’t have to add any more perlite. However, to keep your soil in tip-top shape moving forward from season-to-season and year-to-year, see the notes in our article about regularly top-dressing your beds with compost and mulch. Hope this helps!
I just planted peonies yesterday but I think I may have compacted the dirt to to much how can I loosen up the soil without harming the bulbs, help please
Hi Michelle! Not sure how big an area of compacted soil you’re dealing with, so it’s hard to provide a clear answer. Is this a large row of peonies? A single garden bed or a small planted area? We generally prefer to let biology do the work for us when it comes to fixing compacted soil. If you’re dealing with a relatively small area, we’d simply top-dress the soil with worm castings (or compost), then top-dress over the worm castings with 2-3″ of untreated mulch (wood chips, straw, or something similar) then let the soil microbes + plant roots do the work for you. Without biology in your soil it will eventually compact anyway, so best to go ahead and jump-start the process and build living soil asap.
That’s very useful information thank you.
When is the best time of year to do this. It’s September here and I live in west suburbs of Chicago
Hi Ted! Our understanding is the soil in Chicago will be a frozen ice brick from fall – late winter/early spring. Depending on how fast you’re trying to fix your compacted soil and which method you choose to fix it, you might be better off waiting until your soil starts to thaw out next year (especially if you’re planning to do something like cover crops or compost + immediately add plants). However, it certainly can’t hurt to go ahead and mulch your soil now to get a bit of a jump start and potentially prevent soil erosion/pollution, assuming you’ve got a bare patch of earth as a starting point. Best of luck!
Greetings. I recently began gardening (mostly veggies) in a community garden plot. A long, cold and wet spring prevented us from planting until fairly recently. During those cold/wet weeks in mid-late spring we added a couple inches of topsoil (scott’s premium sphagnum peat moss) and tilled it into the existing soil. Since then – In the past few weeks, we’ve planted numerous veggies and flowers. The weather over the past few weeks is great – not too hot, cold, dry or wet. The plants are living, but they’re definitely not thriving (at least not as well as some plants we’ve potted). It seems that the soil has become compacted – and when I dig into it I’m not seeing a lot of critter activity (no worms for instance). Given that all our veggies have been planted for 2-3 weeks, would it help/hurt to try to condition the soil – perhaps by amending the soil surrounding the plants with vermiculite, or by aerating the surrounding soil with spike shoes or even plugs? Thanks for your thoughts. Appreciate this article and wish I’d read it a couple months ago!
Hi Stephen! Dried sphagnum moss is mostly carbon. By tilling it in, you’ve temporarily locked up the nitrogen in your soil as the decomposition process gets underway. This is a short-term problem but it’s nothing to worry too much about.
Not sure how many beds you have in your community garden, but here’s our general recommendations given your specific situation:
1) Don’t worry about tilling, especially now that you have plants in. In fact, we’d encourage you to go no-till organic from here on out.
2) Assuming your seedlings are getting adequate water (remember transplants need to be “watered in” and kept damp so their roots take) your plants sound like they mostly need a fertility boost – especially nitrogen. A liquid kelp emulsion (like this one https://amzn.to/3033bh2) would give them an instant well-balanced fertility boost. Just follow the dilution ratios on the bottle if you go that route. Or, if your fellow gardeners are ok with it, you can use your own homemade liquid fertilizer, aka liquid gold. That’s fresh human pee diluted anywhere between 6:1 – 10:1 with water before applying. It’s also free and abundant. If anyone is squeamish about this, just remind them they’ve been eating plants their whole life that were grow using human biosolids and animal manures.
3) Immediately after fertilizing your plants, use a pitchfork to poke some deep holes in your soil throughout each bed. This will help with aeration; similar to using a broadfork, but much easier and better for your setup.
4) Immediately after fertilizing & pitchforking, top-dress your beds with a few inches of untreated mulch/wood chips/chopped fall leaves. Do NOT till these in. Leave them on the surface to protect your soil and encourage the soil biology to flourish. As long as you don’t till it in, it will NOT lock up your soil nitrogen, it will actually increase it as worms and other critters enter the space and start pooping and peeing around the rhizosphere of your plants.
5) Keep an eye on your plants’ leaves for the next few months. They’ll tell you if the plants are getting the nutrition they need. Yellow leaves is typically a sign of low nitrogen, so you may have to apply another couple rounds of liquid fertilizer throughout the growing season as-needed based on what your plants tell you.
Hope this helps!