
DIY cold frames: How, why, and when to use in your garden
As an Amazon Associate, GrowJourney earns from qualifying purchases. Read more: terms of service.
Cold frames are a great season-extending device to help you garden in cold weather or get an early start on your warm weather seedlings. Learn all about cold frames (including DIY cold frames) in this article!
What is a cold frame?
A cold frame is a transparent outdoor frame that protects tender plants from cold weather while capturing heat and allowing sunlight in. This means your plants get natural sunlight and extra warmth. In most regions, a cold frame can be used effectively to grow young seedlings and crops, though if you live in a climate zone below USDA Zone 6, you may need a more fortified version than the one I use in my garden.

What is the purpose of a cold frame?
Why do people use cold frames? A few reasons:
- seed starting,
- season extension, and
- fall and winter gardening.

1. Using cold frames for seed starting
Have you ever tried to start seeds indoors and ended up with anemic, gravity challenged sprigs? Bright, direct light is vital to emerging seeds and most windowsills are not sunny enough — especially modern energy efficient windows that filter out a lot of the sun. If you don’t have a DIY indoor grow light system, then a cold frame is a great way to start summer seedlings when it’s still cool outside, thus getting a jump on the season.
2. Using cold frames for season extension
Maybe you live in a cold climate where it’s hard to get enough above-freezing days to grow some of your favorite garden plants. If so, cold frames are an excellent way to extend your growing season.
3. Using cold frames for fall and winter gardening.
I live in Zone 8a, but still have plenty of deep freezes during the winter. Even though I garden year round, my cool weather crops require protection. For larger spaces and row crops, row covers provide great winter protection. However, for smaller spaces, cold frames are a great choice for growing edible plants throughout the winter months for most climates. Thankfully, cold frames are also easy and inexpensive to build!
How to make cold frames
If you’re not the DIY type or you don’t feel like making your own cold frame, you can order a highly rated cold frame via Amazon. It’s made of durable materials, lets in light from all angles, and you probably couldn’t make it more affordably if you were to buy all the pieces/parts yourself. However, if you’re ready to make your own cold frame, read on!
Three parts of a cold frame:
1. Top
The top of the cold frame is made from clear, light-permeable material. Popular options are:
- glass (such as old windows),
- plexiglass, and
- greenhouse plastic.

2. Sides
The sides of a cold frame are made of any material that will create a supportive structure for the cover. I’ve seen cold frames whose sides are made of wood, insulated material, or even the same light-permeable material the top is made from.
3. Bottom
A constructed bottom is not necessary for your cold frame. Most people just use soil. If you decide to create a base for your cold frame, make sure it allows water to drain.
Using recycled materials to make your cold frame
We used recycled windows for our cold frame. Some of them came from a friend’s farm, some of them came from my husband’s coworker, and some of them came from our local Habitat for Humanity store. Glass is the most transparent and permanent material you can use… unless you live next to children playing ball or position your cold frame under the Whomping Willow (or any aging tree)!

Are cold frames heated?
Cold frames are typically unheated. All their plant-protecting power comes from solar energy stored in the structure and soil. However, you can use soil cables to provide supplemental heat to your cold frame. Having a heated cold frame in Zones 6 or lower will allow you to continue growing plants even during the coldest weather conditions.
Available materials and permanence: considerations when constructing your cold frame
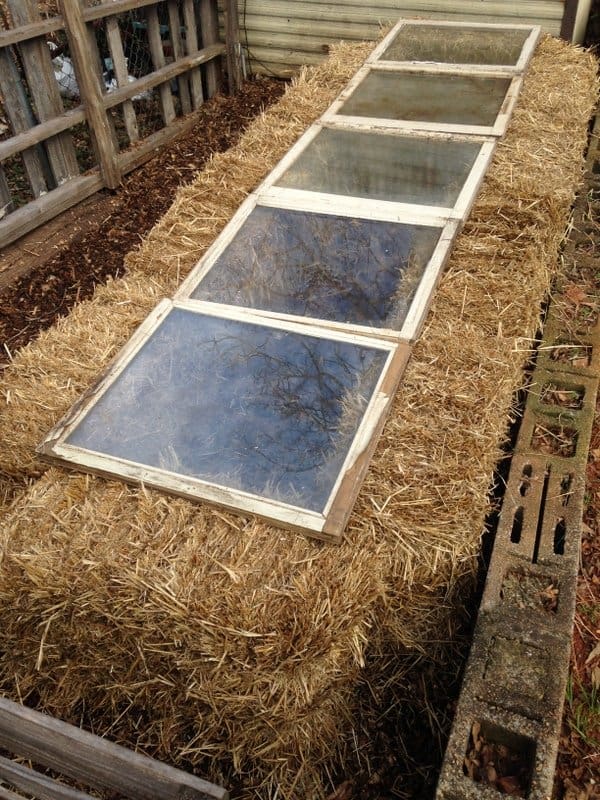
Straw has been our material of choice for the sides of our simple cold frame. Why? Straw bales are:
- thick and very insulating,
- easy to come by (garden, home improvement, and farm stores all carry them),
- relatively inexpensive (in bad hay years the price goes up),
- fully biodegradable when we are finished with them,
- extremely easy to assemble.
We’ve been using straw bale cold frames for years and have found the straw to be perfectly suited for our needs. I had given up on shelf greenhouses or ever getting around to building a wooden cold frame and was carrying my seed trays in and out of the house on warm days. Needless to say I am much happier with our straw bale cold frame! Note that you don’t have to use straw for your cold frame! People also use pine straw bales, lumber, bricks, and many other materials to create cold frames. Use what’s easily available and/or within your budget!
Easy to assemble, easy to disassemble
In our case we don’t have a permanent spot to keep our cold frame, so it has moved around the past few years. Sometimes, it’s in our driveway, sometimes next to our shed, and sometimes it is out in the garden. That means our building materials and cold frame needed to be:
- easy to carry, and
- easy to take apart and put back together again.
When the summer plants are dormant we could even put a temporary cold frame on top of one of our late-emerging garden beds.

Recommended placement of your cold frame
You can put a cold frame just about anywhere in your yard. However, the best places get south-facing sunlight for early morning sun. The least effective placement of a cold frame is on the north side of a house, building, or tall tree, where there’s not enough sun exposure.

What are the best plants for cold frames?
Since the plants inside will only be a little bit warmer than the outside air, cold frames are mostly used for cold-tolerant plants during the winter. Here’s a list of the best plants to grow inside a cold frame, from A-Z:
- arugula
- broccoli
- carrots
- cauliflower
- chicory
- cilantro
- collard greens
- kale
- lettuce
- mache
- mustard greens
- parsley
- parsnips
- pea greens
- radishes
- rutabagas
- scallions
- spinach
- turnips
Check out our article Easiest plants to grow in the fall and winter, for more details on these frost-hardy plants that also double as ideal cold frame crops!
Spring transplants under cold frames
You can also use your cold frame to grow out your spring transplants. If you do, you’ll want to pay careful attention to the weather and bring the more tender seedlings inside on nights when it drops below freezing.

When do you close your cold frame?
Although most winter crops are at least a little bit frost tolerant, they don’t grow when it is under 40°F (4°C) outside. They’ll appreciate the cover of your cold frame staying on any time the weather is below 50°F (10°C).
When do you open your cold frame?
Likewise, cool weather crops don’t like it hot. If the thermostat says 50°F (10°C) or warmer, crack your cold frame cover or take it off completely. You’ll start to get a feel for how warm or cool your specific cold frame stays as time goes on!

As the weather warms…
By late spring, you’ll start leaving the cover off of your cold frame all the time. We usually leave our cold frame up until we’re well past any freak late freezes. Then we give the straw bales a second life by spreading them under our rows of blackberry and raspberry brambles. When the berries leaf out and send out new canes they rest on top of the bales and block light from competing weeds. While the bales are under the brambles, they become hosts to mushrooms and other soil organisms. We think (or hope!) the summer mushroom colonies mycoremediate any herbicides the straw farmer used. Ideally, you can find straw bales that don’t have pesticide residue so this issue doesn’t have to be a concern. By fall the bale weed barrier has rotted enough to lose its form. The bales get a third life in the garden when they’re dumped in the chicken run to be dismantled as a precious feast by our laying hens. At that point they become compost that we can use to fertilize our next batch of seedlings!

Cold frame FAQs
Answers to frequently asked questions about cold frames:
How cold is too cold for a cold frame?
If temperatures in your unheated cold frame regularly stay below freezing, even the most cold hardy plants won’t thrive or put on new growth. In such climates, you can either opt to use soil cables to provide supplemental heat or only use your cold frame during the edge seasons (early fall and early spring) but not during the middle of winter.
What’s the temperature differential between inside and outside of a cold frame?
Weather conditions are the main factor dictating the difference between the outdoor temperatures and the temperatures inside your cold frame. The more warm and sunny it is outside, the warmer it will be inside your cold frame. At night and on overcast days, there will be less of a temperature differential. For instance, on sunny days when the outside temperature is 50°F (10°C) or higher, the inside of your cold frame could easily heat up to be 15-20 degrees warmer that the outdoor temperature. However, on a snowy 20°F (-7°C) day, the inside of your unheated high tunnel is probably only going to be a few degrees warmer than the outside temperature.
Do you have to use a sloped lid on your cold frame?
No, you don’t have to use a sloped lid. A sloped cold frame design is intended to let in maximum sunlight when positioned in a south-facing direction. Depending on your cold frame design and setup, you could have a flat cold frame (like the straw bale cold frame pictured in this article). Also, if the sides of your cold frame are transparent, there’s no reason to have a sloped lid.
If you’re using poly sheeting on a cold frame, what’s the ideal thickness?
For cold frame poly sheeting, we’d recommend a thickness of at least 6 mil to provide a nice balance of strength, longevity, and light transmission. If you’re using plastic sheeting on your cold frame, just make sure it’s well-secured to the frame or weighted down so that strong winds can’t blow it off!
What kind of wood is best for a cold frame?
The most popular cold frames (or at least the most photographed) are typically wooden frames with a hinged lid covered in glass. Wood will make little difference as far as insulating value, so the main factor you’ll need to consider if you plan to build a wooden frame is the durability of the wood. If you want untreated wood, cedar or black locust are ideal. Treated pine is long-lasting and easy to find at any home improvement center.
Can you partially bury your cold frame for extra warmth?
In the winter, the subsurface soil temperatures are warmer than the soil surface, so you might wonder if burying your cold frame is a simple solution to better maintain warm air inside. However, this approach is probably not a good idea anywhere that heavy rains are a common occurrence. The inside is likely to get flooded and/or become so wet that it rots the plant roots. A ground level cold frame is a better all-around option.
What’s the ideal size of a cold frame?
The size of a cold frame should be based upon what design fits in your space, what plants you intend to grow, and what’s easiest to maintain and operate. Do note that smaller cold frames won’t hold heat as well as large cold frames, so size is a factor to consider when designing your cold frame. A cold frame any smaller than 3′ x 3′ probably isn’t worth the effort. You’ll also want to factor in the height of the plants you intend to grow so that the tops of the plants have room to grow without getting smashed, frozen, or broken by the top of the frame.
We hope this article helps you better understand what cold frames are, how to use them, and how to build one yourself. Happy gardening! -Eliza @ GrowJourney Master Gardener, Master Naturalist, Permaculture Instructor
Other helpful cool season gardening articles:
- Best cold weather garden plants
- Easy and affordable DIY grow light system
- Fall and winter succession planting for continual garden harvests
- How to grow Austrian winter peas for the best pea greens ever
- Organic pest control for kale and other brassica crops
- Late winter and early spring garden transition tips


For Jeff (and anyone else interested),
I put 2 liter bottles almost filled with water in my greenhouse to trap heat during the day. The heated water helps keep the temps higher on cold nights. If the temps are extreme they are not enough. But, if the temps are hovering around freezing and there was plenty of sunlight, the bottles will certainly do the trick. And they are a very economical way to supplant the heat.
I built a nice, solid cold frame of wood, with a plastic foil covered lid and automatic openers. I measured the temps day and night and was disappointed to find that it barely stayed warmer inside than out during nights. Like 1.5 Celcius. Would glass or plexiglass be that much warmer than plastic foil? It is built pretty tightly, and the wood is fairly heavy.
Hi Jeff! Sorry you’re having difficulty keeping your cold frames warm inside.
Unfortunately, there isn’t a single, simple answer to your question, and it’s also difficult to provide specific advice without seeing your exact setup. However, here are a few pointers that may help you create a warmer cold frame:
1. The best placement for a cold frame is one that gets south-facing, early morning sunlight. Ideally, you could position it next to another larger structure that traps heat, such as the side of a house, large rocks, etc.
2. You want a top on your cold frame that lets as much solar radiation/heat into the cold frame as possible while also minimizing heat loss. Materials like glass (example old windows) or double layer poly (if you want to get fancy) are ideal. I apologize for not knowing what “plastic foil” is to be able to directly provide feedback on that material.
3. The thermal mass of your structure is very important for trapping, holding, and slowly releasing heat back into the structure at night or during sunless days. Straw bales (like those shown in this article) or pine straw bales are about the biggest bang for your buck you can get. If you’re using standard lumber, you do want your structure tight to prevent drafts and heat loss, as you said. However, wood will only store so much heat, so you’re primarily relying on the soil in the structure to hold heat. Since cold frames are typically fairly small, that means you may need to have additional insulating layers around the outside of your cold frame during cold months and/or cold nights.
Temperature differentials between inside your cold frame and outside your cold frame are going to vary based on your weather:
-Scenario 1: Consecutive sunless cold days and cold nights are going to eventually sap pretty much all the heat out of your high tunnel. In this scenario you may only be able to maintain temps 1-5°F above outdoor temps.
-Scenario 2: On cold below-freezing sunny days, you should expect cold frame temps 5-10°F above outdoor temps.
-Scenario 3: On warm sunny days, your cold frame can get quite warm, 15-20°F+ above outdoor temps, which would likely require you to open the structure (your automatic openers probably do that for you).
So perhaps the solution(s) to your problem are: 1) Making sure you’ve located your high tunnel in the ideal spot/microclimate, and 2) adding additional insulating materials around the outside of your wood frame.
Hope this helps and please let me know if you have any other questions!
Hi,
How does the plants get water in the winter time if the pants are completely covered by the glass window?
Hi Miranda! In winter, plants need WAY less water than plants growing in the summer. For mature plants grown in-ground under a cold frame, rainwater still saturates the surrounding ground enough to provide adequate water for the plants growing inside the cold frame unless you live in a really dry, arid climate. In that case, you’d need to provide supplemental irrigation every so often as-needed.
Thinking about building my first cover with an old glass door. Can you elaborate on watering with the cover? Since rain can’t get in (but moisture might build up) so you have any successful watering strategies? Thanks!
Can I use hot compost in my cold frame to provide some heat.
Technically, yes, but that would be difficult to do because: a) cold frames are typically relatively small, and b) to continue producing heat, hot compost has to be kept in a large pile and turned periodically, both of which would be difficult inside of a cold frame.
The easiest ways to keep a cold frame warmer are: 1) to put them in the ideal location relative to the position of the sun, 2) build or buy a quality cold frame that has adequate thermal mass and minimal draft so as to retain as much heat as possible, and 3) use supplemental heat sources such as soil warming cables.
If I have a structure tall enough for tomatoes and squash can I place blackened milk jugs inside for warmth? We live in Georgia
Tomatoes and squash really need lots of heat to produce well – lows no lower than 60s and highs in the upper 80s. It’s really hard to replicate that outside of a greenhouse environment in the wintertime, and it probably isn’t worth the effort. That being said, we certainly wouldn’t discourage anyone from doing garden experiments if you think you’ve got a nifty idea that will work. There’s only one sure way to find out, and that’s via trial and error.
Like the whole straw thing … pretty cool!
Thanks, David! I believe that photo was taken in the garden of Eliza (the author, and our Education Director). She comes up with some great ideas. 🙂
Very useful article. Thanks for the info!
Thanks Mike! Glad it was helpful.